-
Gluten-free Tuscan Peasant Soup with Sausage

This Tuscan peasant soup is a version of a classic dish found in Marcella Hazan’s “Essentials of Classic Italian Cooking”. I received a copy from my sister-in-law for my birthday a couple of years ago and spent a week of reading it cover to cover. It’s an amazing cookbook, especially if you are a cookbook fangirl like I am. One recipe stuck out to me — the Tuscan Peasant Soup With Cabbage and Beans, or, Aquacotta. It’s the perfect post-holiday meal for when you’re tired of the richness of December food and the perfect cold-weather stew. It has in-season January produce, some of which I sometimes have in my garden just ready to harvest.
I altered this recipe pretty heavily to make it a little easier, gluten-free (Marcella’s version is poured over a layer of bread). I also made it a little bigger to go a further as a refrigerator staple for the week. We needed it to be more hearty, and that’s where the sausage comes in. It turned out to be one of our favorite meals and something we make regularly. My husband, who is not a soup person (he says, but that’s not possible in my opinion), loves it and asks for it when it’s cold outside. Whip it up in your favorite pan and have a glass of Beaujolais while you cook. It’s like therapy.
The beauty of soups
I make a lot of soups. They are perfect for keeping on hand for lunches (especially if you work from home like I do), quick dinners, and you can make them buildable and add on to them as the week goes on. For instance, we may add some gluten-free pasta to this dish to make it into an entirely different meal one night, or top it with goat cheese instead of parmesan. The options are endless with soups.
Soups are healthy, cheap (usually), easy, and a crowd pleaser. This one is particularly versatile because you can adjust the broth level to high-soupy or more stew-like, which lends it to being made into other dishes (like a pasta topper) after sitting for a night or two in the fridge.
Here is my version of this classic dish:
Gluten-free Tuscan Peasant Soup with Sausage
A gluten-free version of a classic Italian stew
- 1 onion, diced ( )
- 2 tbsp avocado or olive oil
- salt, to taste
- 3 cups finely chopped kale
- 5 cups finely chopped cabbage (or more) (more cabbage is better in this dish, in my opinion. I used a whole head of Savoy or Napa cabbage.)
- 28 oz can of whole, peeled tomatoes
- 15 oz can of stewed tomatoes (You can play with the quantities and types of canned tomatoes here depending on your preference. )
- 2-3 cups chicken bone broth (Or more, whatever will cover the vegetables and meat and give you the broth level you want)
- 1 lb Italian sausage, ground (you can use turkey or pork, whatever you like)
- 1/2 cup parmesan cheese, grated or shredded
- 15 oz can cannellini beans, drained and rinsed (any white bean will work for this)
- 1 large egg – one for every person you are serving
- 1/3 cup lemon juice
- 1/2 cup chopped, fresh basil (or other garden herbs, to taste)
In a large Dutch oven or stock pot, sauté the onion in the oil until it starts to wilt. Add the turkey sausage and break it up into tiny pieces. Add some salt, then the kale and cabbage. Stir until wilted, then add the broth, tomatoes and the basil. Simmer for an hour on low, covered.
At the end of the simmering hour, in another saucepan, bring the lemon juice along with an inch to two inches of water to a boil. Add the eggs (poach them) when it comes to a boil. Let them poach for about 2-3 minutes.
Meanwhile, add the beans to the veggie mixture. Stir and correct for salt. Add some cracked pepper, to taste. Sprinkle about half the cheese on top of this, and leave simmering on low.
When the eggs are poached and still runny, scoop them from the sauce pan in a slotted spoon and place them on top of the vegetable and sausage dish. Add the rest of the cheese, and let them simmer another minute or so. Garnish with chopped fresh herbs (parsley and oregano worked well).
Serve each person a helping with an egg on top, preferably with a good glass of wine.


For more soup recipes, click here.
This post contains affiliate links.
-
Fall garden tips – time to plan your North Texas crops
It’s time to start planting your fall garden! Gardening is my second favorite activity (to cooking). There is nothing like deciding what to have for dinner and heading into my front yard to pluck the ingredients. My kids like to join in too — they love to try each kind of lettuce and then spit it out and tell me it’s gross (joke’s on them- they’re trying it!). They especially adore pulling carrots they’ve planted and helping me pick green beans, cherry tomatoes or blackberries. Below I’ve outlined the things you can plant right now for a productive fall garden. I like to plant some of what I want now and save the rest for later in the month so my harvest is stretched out a bit longer. I’ll also start some seedlings so I can stretch my fall garden to a winter garden.
Fall is pretty forgiving in Texas, so you can try things that may not be traditional for planting so late (like the pie pumpkin patch I am attempting) but if you want to be really precise, check out the Almanac planting calendar.
Herbs
- In my garden, herbs perform better than any of the other edible crops. I plant everything I can get my hands on that will fit in my small space — cilantro, oregano, basil, lavender, dill, and more. And you bet I use them every day, like in this gin and rosemary cocktail.

Root Veggies
2. Root veggies, like carrots and radishes, are a real crowd pleaser if you have kids who like to help in the garden. There is something so satisfying about watching them pull up veggies that they planted and will actually eat! You must till your soil deeply for success and sow them very shallow, not more than 1/4 of an inch. Edible crops like these can be hugely satisfying and a great way to involve the kids in cooking and eating healthy.

Beans and Peas
3. Beans and peas are so easy, they are the go-to for kindergarten teachers to have classrooms full of 5-year-olds plant in cups with wet paper towels. Seriously, if you have a little bit of decent soil, a trellis of some sort, sunlight and water, you will be kept in fresh beans/peas/snap peas all spring and sometimes into the fall if your summers are mild. Plant more than one variety for the best crop, and be sure to harvest these as they become ripe to allow the plants to produce as many as possible.

Greens
4. Lettuces, chards, kales, cabbages and other greens tend to do well in cooler early spring weather, and may even survive one last frost. I’ve already done spinach and several lettuces and will get cabbage and chard in the ground towards the end of March. And you’ll have plenty for this classic Italian soup.

Potatoes
5. Potatoes are another fun one because they are deceptively easy. They usually get planted in the early spring, but will sometimes perform well in autumn too. I use a grow bag, which eliminates the need for laborious digging to harvest. You can buy seed potatoes in the spring, but they are unavailable for fall planting (typically). I save a potato from a bag of organic gold or red potatoes and let it sprout on my windowsill (place the potato in a cup of water halfway up the side of the potato, using toothpicks to keep it above the water line). Once it sprouts, cut it into slips and plant them in your grow bag. We had tiny, fresh, yummy gold potatoes for weeks. Roast them in duck fat like I do here.

I know this varies a bit based on what zone you are in, but most of these are fairly common to North America for this time of year (especially if you have cold frames or a greenhouse for your seedlings). Be sure to know your first frost date and plan accordingly for cold frames or blankets to protect tender greens or fruits.
Here are a couple of links to help you determine what’s right for your garden and your area. I also love Garden Betty for inspiration and tips!
Happy digging!
-
Basic lasagna with garden veggies


Subscribe to continue reading
Subscribe to get access to the rest of this post and other subscriber-only content.
-
Sweet rum limeade

This sweet rum limeade is one of my favorite recent drinks I’ve concocted. I have been seeing Brazilian lemonade all over Tik Tok lately and have been wanting to try it, but I was in the mood for something easy that didn’t require a blender, so I put together this basic three ingredient cocktail instead.
Rum limeade, for two:
3 oz dark rum (or rum of choice — not flavored or spiced)
Juice of two large limes
Two tablespoons sweetened condensed milk
Shake all ingredients vigorously over a full shaker of ice. Strain into two glasses. Enjoy!
Sweet rum limeade -
Fluffy homemade cinnamon rolls

Everyone loves homemade cinnamon rolls. While the kind that pop out of the can are tasty, nothing can beat made-from-scratch, hand-rolled, fresh from the oven homemade cinnamon rolls. These are particularly special because I made them from a simple French bread recipe, so the dough isn’t sweet and cuts through the sweetness of cinnamon sugar filling and frosting just right.
All four members of my household were sick this weekend, so all of our plans went down the drain. So what did we do after the boredom set in? Bake, of course. We baked holiday cookies, loaves of fresh bread, and of course these rolls.
How to make homemade cinnamon rolls
Really making these is super easy — you roll out your favorite bread recipe to about 1/4 inch and spread your filling on it, roll it up, cut into 1 inch pieces, and bake. I did tweak my bread recipe a bit… I used a simple French bread recipe but doubled the sugar from 2 tablespoons to 4 tablespoons and added 2 tablespoons of cinnamon before I let it rise the first time. After letting the dough rise about an hour, I divided it into two pieces and rolled each out to assemble the cinnamon rolls. I placed them in a pan with a good lip (a roasting pan or heavy duty baking sheet will work) on a greased parchment sheet and let them rise for about another hour before putting them in the oven at 375 Fahrenheit for 20 minutes.


Fluffy Homemade Cinnamon Rolls
- 1 tbsp yeast (or one packet)
- 2.5 cups warm water
- 4 tbsp sugar
- 1 tbsp salt
- 2 tbsp cinnamon
- 3 tbsp avocado oil (or other oil)
- 6 cups flour, plus a little for kneading/rolling out
For the filling
- 1 cup salted butter (two sticks), softened
- 1 cup sugar
- 2-3 tbsp cinnamon (or more, to taste)
For the dough
Place the warm water (no more than 100 degrees) in a large mixing bowl with the yeast and sugar. Allow them to get a little bit bubbly and activate by letting it sit about 3-5 minutes.
Add the salt and oil and stir gently. Add the cinnamon and mix.
Add about half the flour and mix thoroughly. You can mix by hand with a spoon or in a stand mixer.
Add the rest of the flour, a little at a time, until the dough forms a ball.
Adding flour as needed, knead the dough with your hands while it is still in the bowl until it is a smooth ball.
Cover and let rise about an hour, or until it has at least doubled in size.
To assemble the rolls
Flour a countertop lightly, then plop the dough out of the bowl. Separate into two balls.
Using a rolling pin, roll the first ball of dough to about 1/4 inch thick.
In a separate bowl, place the softened butter, sugar and cinnamon and mix until they form a gooey consistency.
Spread half the mixture onto the flattened dough.
Working slowly, begin to roll the dough lengthwise until it is completely rolled. At this point you may need to stretch it out a bit.
Cut 1 to 1.5 inch slices. Place onto a greased sheet of parchment paper on a baking sheet with a lip.
Repeat with the second ball of dough.
Bake at 375 for 20 minutes. Allow to cool in the pan for at least 5 minutes.
Serve alone or with cream cheese frosting!
For more breakfast ideas, visit me here.
-
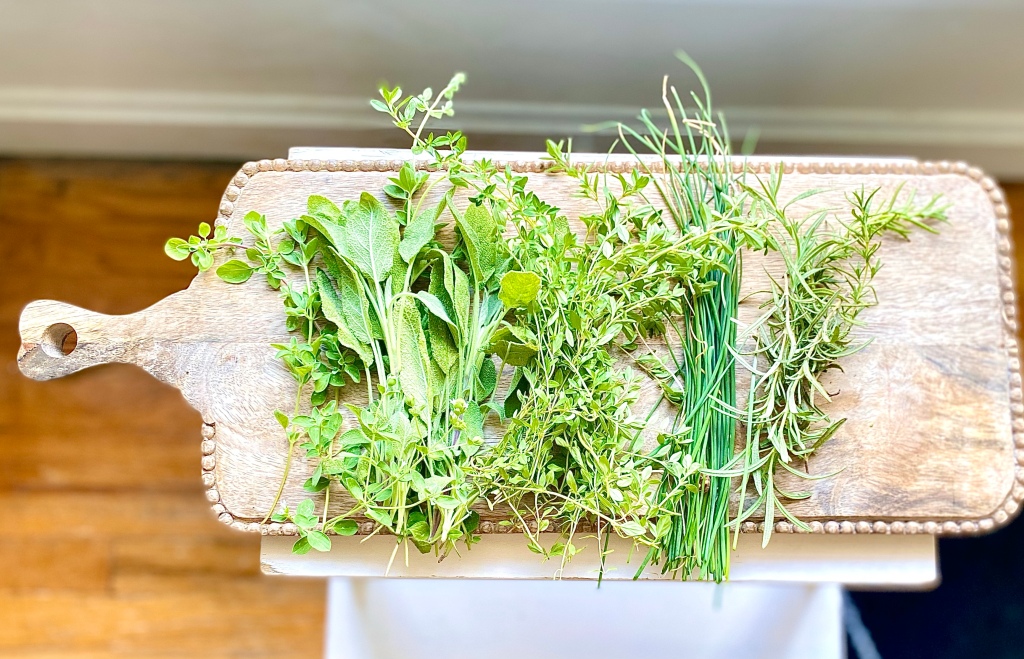
Gluten-free Tuscan Peasant Soup with Sausage
This Tuscan peasant soup is a version of a classic dish found in Marcella Hazan’s “Essentials of Classic Italian Cooking”. I received a copy from my sister-in-law for my birthday a couple of years ago and spent a week of reading it cover to cover. It’s an amazing cookbook, especially if you are a cookbook fangirl like I am. One recipe stuck out to me — the Tuscan Peasant Soup With Cabbage and Beans, or, Aquacotta. It’s the perfect post-holiday meal for when you’re tired of the richness of December food and the perfect cold-weather stew. It has in-season January produce, some of which I sometimes have in my garden just ready to harvest.
I altered this recipe pretty heavily to make it a little easier, gluten-free (Marcella’s version is poured over a layer of bread). I also made it a little bigger to go a further as a refrigerator staple for the week. We needed it to be more hearty, and that’s where the sausage comes in. It turned out to be one of our favorite meals and something we make regularly. My husband, who is not a soup person (he says, but that’s not possible in my opinion), loves it and asks for it when it’s cold outside. Whip it up in your favorite pan and have a glass of Beaujolais while you cook. It’s like therapy.
The beauty of soups
I make a lot of soups. They are perfect for keeping on hand for lunches (especially if you work from home like I do), quick dinners, and you can make them buildable and add on to them as the week goes on. For instance, we may add some gluten-free pasta to this dish to make it into an entirely different meal one night, or top it with goat cheese instead of parmesan. The options are endless with soups.
Soups are healthy, cheap (usually), easy, and a crowd pleaser. This one is particularly versatile because you can adjust the broth level to high-soupy or more stew-like, which lends it to being made into other dishes (like a pasta topper) after sitting for a night or two in the fridge.
Here is my version of this classic dish:
Gluten-free Tuscan Peasant Soup with Sausage
A gluten-free version of a classic Italian stew
- 1 onion, diced ( )
- 2 tbsp avocado or olive oil
- salt, to taste
- 3 cups finely chopped kale
- 5 cups finely chopped cabbage (or more) (more cabbage is better in this dish, in my opinion. I used a whole head of Savoy or Napa cabbage.)
- 28 oz can of whole, peeled tomatoes
- 15 oz can of stewed tomatoes (You can play with the quantities and types of canned tomatoes here depending on your preference. )
- 2-3 cups chicken bone broth (Or more, whatever will cover the vegetables and meat and give you the broth level you want)
- 1 lb Italian sausage, ground (you can use turkey or pork, whatever you like)
- 1/2 cup parmesan cheese, grated or shredded
- 15 oz can cannellini beans, drained and rinsed (any white bean will work for this)
- 1 large egg – one for every person you are serving
- 1/3 cup lemon juice
- 1/2 cup chopped, fresh basil (or other garden herbs, to taste)
In a large Dutch oven or stock pot, sauté the onion in the oil until it starts to wilt. Add the turkey sausage and break it up into tiny pieces. Add some salt, then the kale and cabbage. Stir until wilted, then add the broth, tomatoes and the basil. Simmer for an hour on low, covered.
At the end of the simmering hour, in another saucepan, bring the lemon juice along with an inch to two inches of water to a boil. Add the eggs (poach them) when it comes to a boil. Let them poach for about 2-3 minutes.
Meanwhile, add the beans to the veggie mixture. Stir and correct for salt. Add some cracked pepper, to taste. Sprinkle about half the cheese on top of this, and leave simmering on low.
When the eggs are poached and still runny, scoop them from the sauce pan in a slotted spoon and place them on top of the vegetable and sausage dish. Add the rest of the cheese, and let them simmer another minute or so. Garnish with chopped fresh herbs (parsley and oregano worked well).
Serve each person a helping with an egg on top, preferably with a good glass of wine.
For more soup recipes, click here.
This post contains affiliate links.
-
Chardonnay Chicken

This chardonnay chicken recipe is super easy and is just the thing to fancy-up a regular weeknight meal. I used a chardonnay gifted to me by Prescription Vineyards and chicken from Omaha Steaks and the combo was perfect (we drank the chardonnay with the chicken also and that was even better).
Here’s how to make this simple recipe:
Slice a red onion thinly and place rounds of it on the bottom of a greased baking dish. Place four large chicken breasts on top of the onion rounds, then cover the chicken with chopped garlic (I used at least seven to eight cloves). Add a large tablespoon of butter on top of each chicken breast, then generously season them with salt and steak seasoning. Pour about a half cup of heavy cream on and around the chicken, then about a half cup of the chardonnay. Sprinkle some fresh thyme on top. Bake at 400 for roughly 25 minutes, or until it’s bubbling and the chicken is not pink in the middle.
Substitutes for chardonnay chicken
You can make this dish your own in a lot of ways. The thyme can be subbed for another herb, like sage, basil, oregano, or parsley. Chives would also be amazing. You could add some canned tomatoes to give it an Italian flair. Half and half or whole milk can be subbed for the heavy cream if you are out of cream. You could use pork chops instead of chicken, if that’s what you have on hand! I served this with green beans, but a potato dish would be amazing with it. This goes with almost any side dish you can think of, and everyone liked it (even the kids, and they are difficult to please!).

Here’s the recipe:
Chardonnay chicken
- 4 large chicken breasts
- 1 red onion, sliced thinly into rounds
- 8 cloves garlic (or to taste)
- 4 tbsp butter
- 1/2 cup heavy cream
- 1/2 cup chardonnay
- 2 tbsp fresh thyme
- 1 tsp salt (or to taste)
- 1 tsp steak seasoning (or to taste)
Slice a red onion thinly and place rounds of it on the bottom of a greased baking dish. Place four large chicken breasts on top of the onion rounds, then cover the chicken with chopped garlic (I used at least seven to eight cloves). Add a large tablespoon of butter on top of each chicken breast, then generously season them with salt and steak seasoning. Pour about a half cup of heavy cream on and around the chicken, then about a half cup of the chardonnay. Sprinkle some fresh thyme on top. Bake at 400 for roughly 25 minutes, or until it's bubbling and the chicken is not pink in the middle.
For more chicken recipes, visit me here.
-
Taylor Swift listening party menu ideas

If you haven’t had a Taylor Swift listening party yet (because it was at midnight and you have a job), you are probably planning to listen to Midnights within the next day or two. Every good listening party needs a good menu. Here are a few ideas to make the evening even more magical (although with a new Taylor Swift album that may not be possible).
To eat:
- Coconut madelines – these are fancy, pretty, and taste amazing. If you don’t like coconut, you can sub it out for chocolate chips, walnuts, or fruit pieces. These are also gluten-free and pack a delicate, cake-like texture.
- T-Swift is a known burgers and fries fan, so this burger recipe will fit the bill. Add a side of air fryer duck fat fries if you want to be a little more indulgent.
- If your party is actually at midnight, you may want more of an appetizer menu. These little caprese-like poppers are bite sized and perfect with a too-late cocktail.
- Another Taylor Swift favorite is ice cream, and this coconut milk version is easy to make and easy on the stomach, so when you find out the tea about Scooter Braun it won’t unsettle.
To drink:
- Obviously I had to go with the lemon lavender Vesper martini, because… well, lavender. (Make sure you have some fancy glasses for the best vibe.)
- This Negroni cocktail with honey and rosemary is perfect to go with the chill vibes of any Taylor Swift album, add some Prosecco if you want to be trendy (Stunning!).
- If you’re listening with kids (mine are eagerly awaiting when the clock strikes 5 today to start ours) or just don’t need a cocktail at midnight, this healthy chocolate shake or this healthy hot chocolate will be perfect.


Coconut madelines dusted with powdered sugar and cooking on a baking rack 

-
Brown Butter Banana Bread

This brown butter banana bread is a decadent morning treat. If you’ve been saving up ripe bananas in the freezer, this is your reminder to use them! I used three frozen bananas and brown butter — yep, brown butter — alongside brown sugar, cake flour, vanilla bean paste and chocolate chips for this scrumptious version of the classic banana bread.

I am a new brown butter convert, and if you haven’t used it in a baked good like banana bread, you simply must try it. It’s super easy, you just put your butter in a sauce pan and simmer it, stirring constantly, until it turns brown. It adds a depth and flavor to cookies, cakes and breads that I’ve never been able to achieve otherwise.
Another trick to making this bread taste amazing is the mixture of vanilla bean paste (extract will do) and almond extract. The two flavors combine with the brown butter to create something truly special. And the brown sugar helps too! Brown sugar and brown butter combine to form magic.
I made this in a regular loaf pan, but it would make excellent muffins too, and take less time to bake. You can also put this in a square pan and bake it for less time for more of a snack-cake appearance.
This recipe would also be great with a frosting drizzled on top, or served alongside some fruit or a frittata, but it stands on its own well with a cup of coffee. This can be a breakfast cake or a snack cake, and would also be great with some walnuts or almonds added in. Raisins or chopped apples would also make great additions! If you are a coconut person, that would be my personal choice of an add in.
Brown Butter Banana Bread
- 2 cups cake flour
- 1/2 cup granulated sugar
- 1 cup packed brown sugar
- 1 tsp baking powder
- 1 tsp cinnamon
- 1/2 tsp salt
- 1 stick butter (browned)
- 1 large egg
- 3 regular ripe bananas
- 1 tsp almond extract
- 1 tsp vanilla bean paste
- 1 cup chocolate chips ((heaping))
Sift all of the dry ingredients except for the chocolate chips together, mix well. In another bowl, add the bananas and mash them well.
In a sauce pan, add your stick of butter (1/2 cup) and melt it on medium high. Whisk it until it turns brown. Remove from the heat.
Add the butter, egg and extracts to the mashed bananas.
Fold the dry ingredients and wet ingredients together.
Add chocolate chips. Mix.
Spray a loaf pan (about 4" by 8.5") with oil, I use avocado.
Pour batter into the pan. Bake at 350 for about 55-60 minutes, or until a toothpick comes out of the middle clean. Be sure to let it cool completely before serving.
For more breakfast recipes, visit me here.
Making brown butter banana bread -
Basic Chocolate Cake Donuts

Donuts on Sunday morning are a must sometimes (especially chocolate cake donuts). My kids beg for them every week, but sometimes I’d like to get in the kitchen instead of sending them out with their dad for the baked goods.
This morning, I settled in to make these basic chocolate cake donuts with my favorite donut pan and a good cup of coffee.
This recipe is super basic, but I did add chocolate chips for a little bit of fun. When they were done baking, I dipped them in butter and sugar and served with fresh strawberries.
Here’s how to make these chocolate cake donuts:
After mixing the dry ingredients in a large bowl (I used a sifter for the flour and cocoa for a finer texture), whisk the eggs and buttermilk in a separate bowl. Add the vanilla bean paste and melted butter and whisk until foamy. Combine the wet and dry ingredients, being sure not to over mix. The dough will be very sticky and should be in a mound. Add the chocolate chips, and then spread the dough onto a very floured surface.
Let the dough sit about five minutes, and then cover with more flour and shape into a flat circle with your hands. With a rolling pin, roll the dough to about 3/4 of an inch to an inch thick. Then cut them into rounds (I used a biscuit cutter)and place them onto the pan, poking the hole out of the middle as you do. The batter is very sticky and cake, so don’t be afraid to smush it together to fit in the molds. This should make 12-18 chocolate cake donuts depending on the size of your pan and how fluffy you make them. They cook pretty evenly, so you can add more dough to each mold if you want a larger donut.
Chocolate Cake Donuts
A basic baked chocolate cake donut recipe
- 2 cups flour, sifted
- 3/4 cup cocoa powder, sifted
- 1 cup sugar
- 2 teaspoons baking powder
- 1 teaspoon salt
- 4 medium eggs
- 1/3 cup buttermilk
- 6 tbsp butter (unsalted)
- 1 teaspoon vanilla bean paste or vanilla
- 1 cup chocolate chips
- sugar and butter for dipping and dusting the finished donuts
After mixing the dry ingredients in a large bowl (I used a sifter for the flour and cocoa powder for a finer texture), whisk the eggs and buttermilk in a separate bowl. Add the vanilla bean paste and melted butter and whisk until foamy. Combine the wet and dry ingredients, being sure not to over mix. The dough will be very sticky and should be in a mound. Add the chocolate chips, and then spread the dough onto a very floured surface. Let the dough sit about five minutes, and then cover with more flour and shape into a flat circle with your hands. With a rolling pin, roll the dough to about 3/4 of an inch to an inch thick. Then cut them into rounds (I used a biscuit cutter)and place them onto the pan, poking the hole out of the middle as you do. The batter is very sticky and cake, so don't be afraid to smush it together to fit in the molds. This should make 12-18 chocolate cake donuts depending on the size of your pan and how fluffy you make them. They cook pretty evenly, so you can add more dough to each mold if you want a larger donut.


For more breakfast recipes, visit me here.
Modern Hippie Kitchen
Recipes and Kitchen Blog
